Monday, March 30, 2009

Martha Stewart's One Bowl Chocolate Cake


I have found my Cake Recipe. It tastes better than a mix, has no scary ingredients (anybody else have nightmares after reading Omnivore's Dilemma?), and goes from cupboard to oven in about 7 minutes. It's an oil cake so there's no Crisco-induced guilt and no softening of butter. It is insanely moist and chocolate-y without being too dense or fudgy. Plus, it left my entire family in a crumby stupor, leaning back in their chairs sporting chocolate-y half-smiles.

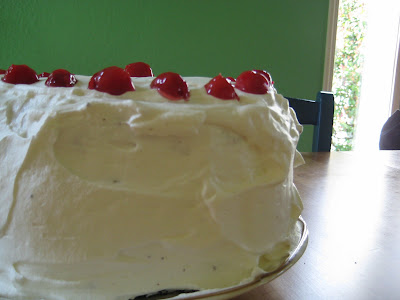
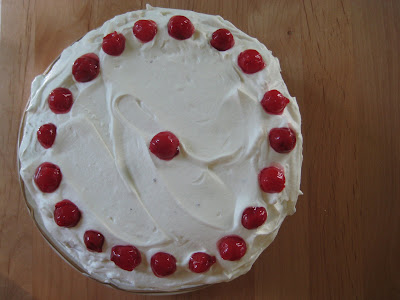
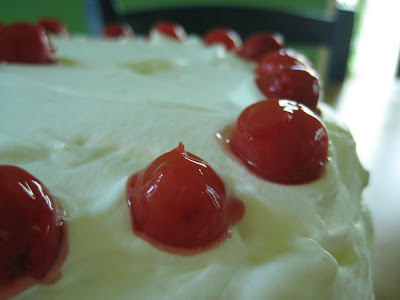
This time, I brushed it lightly with a simple syrup and scattered drained pie filling cherries over the sweetened, whipped, cream between and on top for a Black Forest-esqe cake. (Which, if I may say so, made the prettiest cake to ever emerge from my kitchen.)


Next time I might top simply with powdered sugar (although whipped cream is hard to beat as a frosting, although it doesn't keep well in the fridge.)


If you find yourself reaching for a cake mix time after time, because it's easier, save your money and pick up a can of cocoa next time at the store instead (this baby calls for a whopping cup and a half) and impress all your friends and family. (Or you could be like us and impress your neighbors too. They were the happy recipients of our leftovers, in a last-ditch attempt to save my waist line.)

So go! Go! Make a cake, and make someone happy today.

Recipe originally found here

Martha Stewart's One-Bowl Chocolate Cake

Ingredients

Makes 2 eight-inch square or 3 eight-inch round layers.
  • Unsalted butter, for pans
  • 1 1/2 cups unsweetened cocoa powder, plus more for pans
  • 3 cups all-purpose flour
  • 3 cups sugar
  • 1 tablespoon baking soda
  • 1 1/2 teaspoons baking powder
  • 1 1/2 teaspoons salt
  • 3 large eggs
  • 1 1/2 cups buttermilk
  • 1 1/2 cups water
  • 3/4 cup vegetable oil
  • 1 1/2 teaspoons pure vanilla extract

Directions

  1. Preheat oven to 350 degrees. Butter round or square cake pans, and line bottoms with parchment; butter parchment, and dust with cocoa. (I simply sprayed my pans with this, and it worked great.)
  2. Into the bowl of an electric mixer fitted with the paddle attachment, sift cocoa, flour, sugar, baking soda, baking powder, and salt. With the mixer on low, stir in eggs, 1 1/2 cups warm water, buttermilk, vegetable oil, and vanilla until smooth, about 3 minutes.
  3. Divide batter among prepared pans. Bake, rotating once, until tester inserted in center comes out clean, 35 to 45 minutes for 8-inch layers, depending on amount of batter.
  4. Let cakes cool in pans on a wire rack for 20 minutes, then remove from pans and cool completely, right side up on rack.


Thursday, March 26, 2009

Tikka Masala Scented Lentils

I wouldn't call this authentic anything, but it is rather tasty served over rice with a side of vegetables!

In a crockpot, combine:
1 lb lentils (rinsed and picked over)
6 cups water
5 carrots, peeled and chopped into 3/4" segments
1 tsp. tikka masala paste
2 T. soy sauce
1 tsp. kosher salt
1 lb chicken, chopped and seasoned with soy sauce and ginger. (Marinate ahead of time for the best flavor - we marinate our chicken and then freeze it in 1 lb. bags)

Cook on low 6-7 hours or until lentils are tender. I finished this on the stove to thicken it up and finish softening the lentils - I like my lentils well done. This would probably take about an hour and a half if you did the whole thing on the stove.

Hold back on the salt and soy sauce until the end of the cooking, then season to taste. The Tikka Masala paste can be upped if you like more spice. I like the scent of the spice, but not the actual bite of it, so 1 tsp. was plenty for me.

This made enough to feed is for several meals, so it's a really frugal meal! $1.29 for the lentils, $.99 for the chicken, add in a few carrots, and some miscellaneous spices and things...it comes out to about $3, and it will feed us at least for a few days. Pretty good, I say!

Tuesday, March 24, 2009

Crockpot Hoisin Chicken and Ja Choi Bok Coy

This recipe was originally for a roast chicken. It sounded divine, and it was on the menu for tonight. However, around 2 PM I came to my senses - the chances that my two littles were going to give me an hour before dinner to work in the kitchen were HIGHLY unlikely. So, we adapt! This was a hit with the two year old, along with the accompanying bok choy recipe.

Serve with rice.

Crockpot Hoisin Chicken
Adapted from Serious Eats


4 chicken breasts, cut up
1/2 cup hoisin sauce
2 tsp. minced garlic
1 tsp. grated ginger
2 tsp. fine chili sauce
1/2 tsp. sesame oil
1 Tbsp. rice vinegar
1 Tbsp. soy sauce
1 Tbsp. oil (omit if using chicken thighs)

Combine all ingredients in a slow cooker and cook on High 4-5 hours, or until chicken starts to fall apart. Shred with a fork. Serve over rice.

Ja Choi Bok Choy

In a skillet, heat up 1 Tbsp. oil. Add 1/4 cup Ja Choi and 1tsp. grated ginger. When fragrant, add 6 heads of bok choy, trimmed and washed, plus 1/2 cup water. Cover and steam over medium heat 4-6 minutes, or until tender. Garnish with sliced green onions.

Saturday, March 21, 2009

Strawberry Jam

I made quite a few kinds of jam last summer as I stretched my canning-wings for the first time. This strawberry jam was one of my favorites! It has a nice bright flavor, and a loose set. The recipe is from the Herald- my grandmother clipped it for me last Summer. She loved to clip recipes- when I lived across the state from her, it wasn't uncommon to receive little envelopes containing a fist-full of newspaper clippings and a scribbled note "thought you might could make these- Grandma."

The recipe looks long, but here's the gist: roughly chop the strawberries and combine with the sugar and lemon juice and let macerate. Bring to a boil in a skillet with the butter, and boil 7 minutes. Then, process 10 minutes in a boiling water canner.

The author notes that this is a very soft-set jam, and the fruit will want to float to the top. If you see that happening a few hours after you can them (wait at least 3 hours), try turning the jars over every hour or so to disperse the fruit.

Exquisite Strawberry Jam

Ingredients:
4 heaping cups washed and hulled strawberries (1 pound, 6 ounces; to ensure high pectin content, about a fifth of the berries should be slightly under-ripe)
3 1/2 cups sugar
1/2 cup strained fresh lemon juice
1 teaspoon butter

Coarsely chop the berries by placing small batches of them into the work bowl of a food processor and hitting the "pulse" button several times (you can also do this by hand, of course, it it goes pretty slow.) You should have 3 1/2 cups coarsely chopped berries.

In a large bowl, combine the berries with the sugar and lemon juice. gently stir the mixture using a rubber spatula until the sugar is evenly distributed and the juices have begun to flow; let the mixture stand, stirring gently every 20 minutes or so, for at least 1 hour, but no longer than 2 hours.

Wash 4 half-pint jars. Keep hot until needed. Prepare lids as manufacturer directs.

Scrape the mixture into a 12-inch skillet or saute pan. Add the 2 tsp of butter (this controls the production of foam). Bring mixture to a boil over medium high heat, stirring constantly with a straight-ended wooded or nylon spatula. Adjust the heat downsward to keep it from boiling over, and boil for 7 minutes. Remove from heat.

Remove the skillet from the burner and let the am settle for about 20 seconds; if any foam remans, skim it off. Ladle hot preserves into 1 hot jar at a time, leavine 1/4" headspace. Wipe jar rim with a clean, damp cloth. Attach lid. Fill and close remaining jars.

At this point, the jam may be stored in teh refrigerator or freezer for up to six months or longer without the quality suffering.

For long-term storage at rom temperature, you will need to process the jars in a boiling-water canner for 10 minutes (at 1,000 to 3,000 feet, process for 15 minutes; 3,000 to 6,000 feet, for 20 minutes; above 6,000 feet, for 25 minutes). Using a jar lifter, remove the processed jars from the boiling water and let cool on the counter, undisturbed, overnight.

Makes 4 half-pints.

Sunday, March 15, 2009

LoLo's Turkey Loaf

I was looking for a lower-fat meatloaf that didn't SCREAM healthfood. I didn't immediately find one that I liked...so I winged it. (Don't I always??) The carrots keep things moist, and that's always a good thing with turkey. I used homemade breadcrumbs, because I happened to have a few stale heels from my recent few loaves of bread. (Why eat a dry heel when there's a fresh loaf on the counter?!)

LoLo's Turkey Loaf
2 medium carrots, sliced

1 cup bread crumbs (2 pieces of stale bread, toasted and torn into chunks)

1 egg

2 T olive oil

2 tsp. salt

1 tsp. black pepper

1/2 cup BBQ sauce

1 lb ground turkey


Brown Sugar, Kosher salt, Fresh-cracked black pepper

Combine all but the turkey in the food processor, pulse until finely ground. Turn out into a bowl and turn turkey in by hand. Turn into a glass 9x13 pan, shape into a loaf, and sprinkle with brown sugar (about 3 T.), kosher salt and fresh cracked black pepper. Bake at 350 until done. (About an hour and 15 minutes, or until the internal temperature reaches 180 Fahrenheit.)


Serve with fresh bread or rice. This makes excellent sandwiches the next day!

Friday, March 6, 2009

Meyer Lemon Marmelade

I love marmalade. I know I'm not alone in this, because I see it at the grocery store. Someone else must love it too. And for you, I'm posting this recipe.


I've heard so much about Meyer Lemons, and drooled over meyer lemon trees in my plant catalogs (mostly because I COULD, if I wanted, grow a lemon tree in my living room. Sigh.) but I'd never actually tasted a Meyer Lemon. So, when I found a bag for $5 at my grocery store, I blithely brought it home, where it was stuffed in the fridge and "saved" for something special.

Hello? They're lemons. We don't save lemons for a sentimental occasion to present itself.


So I sliced those 5 lemons whisper thin this morning, plopped 'em in a bowl with enough water to cover, threw a tea towel over the whole thing and walked away until the girls went to sleep.

Now, remember that I only had FIVE lemons. This didn't make a lot of marmalade. In fact, it made one pint, and maybe a 1/4 pint left over after that. So basically, I paid $5 plus sugar, and spent about 2 hours, making 1 jar of marmalade. If you do this, PLEASE start out with more than five lemons or you'll feel like you've lost 3 hours of your life. And marmalade deserves more respect than that.


This recipe is originally from my good friend, and partner in crime/scheming about homeschooling/fantasizing about vegetable gardens/buying way too many seeds and swapping/canning all summer long. We were even pregnant at the same time. She's a good friend, and in this world that can be hard to come by! So enjoy her fantastic marmalade recipe.

One quick note: my favorite way to sterilize jars is to wash them in the dishwasher, and leave it shut until you're ready to fill them. I boiled mine tonight, and they weren't ready when my jam was. Sadly, my marmalade is overcooked. See how dark it turned? It set up really stiff, when I like a looser marmalade. So be warned: have your jars ready! Of course, if I'd been cooking more than 5 lemons, I think the water bath would have been ready in plenty of time. If you're not sure WHAT I'm talking about, go find the Ball Blue Book of Canning at your local library. It's a fabulous resource, and easy to follow. Tons of yummy recipes, too. Since I've only just started canning, I really don't know what I'm doing yet. But, amazingly, it still works. So if I can churn out yummy jams, certainly YOU can too!


Lemon Marmalade

Ingredients:
Lemons
Water
Sugar

Slice off both ends of each lemon, and slice as thinly as possible. Be sure to scoop the seeds out when you see them.

Put all your lemons in a non-reactive bowl and add water to cover. Let stand overnight.

Measure out water and lemons, and pour into a pot. Add an equal amount of sugar to pan. (i.e. if lemons+water= 5 cups, add 5 cups sugar.)

Stir to dissolve sugar over low heat, then raise heat to medium and cook to gelling point.

Ladle into hot jars (leave 1/4" headspace) and process 10 minutes in a boiling water canner.

Monday, March 2, 2009

Dairy-Free Yellow Cake


This recipe is adapted from Better Homes and Garden's 75th Anniversary Edition cookbook. Originally, this was the Yellow Cake recipe, with the Simple White Frosting. My family liked how the edges of the cake were a little crispy, but the cake itself was moist like a breakfast muffin, but not as dense. If the only yellow cake you've had is from a box, try this one! I'm always surprised how it's not very much extra work to make a cake from scratch, but the quality is so much improved that it's almost unrecognizable when compared to a mix.

The frosting is from the same cookbook, their "Creamy White Frosting." It already called for shortening, so I just subbed non-dairy creamer for the milk.


I used non-dairy creamer- this is the first time I've tried this, and it worked well. Definitely a different taste from dairy, but also a different taste from soy milk (which can be a good thing in baking.) A friend with Crohn's disease taught me- she uses non dairy cream and water in a 1:3 or 1:1 ratio for her baking. It's inexpensive, and a good substitute for dairy in most recipes. She even uses it for crepes.

Oh. And about the very green frosting. You see, Ernie managed to fill up her ball jar on Saturday, and chose a cake for her treat. With green frosting. It's St. Patrick's Day, a little early!


Yellow Cake

Ingredients:
3/4 cup shortening
3 eggs
2 1/2 cups all-purpose flour
2 1/2 tsp baking powder
1/2 tsp salt
1 3/4 cups sugar
1 1/2 tsp vanilla
1/4 to 3/4 cups non-dairy creamer plus enough water to equal 1 1/4 cups total

Sift together dry ingredients and set aside.

In stand mixer, cream shortening and gradually add sugar. Beat on medium for minutes more, and add eggs one at a time, then beat in vanilla.

Alternately add non-dairy creamer mixture and dry ingredients, beating just enough to mix after each addition.

Spread batter into greased and floured pans.

Bake at 375 degrees. 20-25 minutes for 9" pans, 30-35 minutes for 8" pans, or 25-30 minutes for a 13x9" pan, or until a toothpick inserted in the center comes out clean. (I used square pans, and needed 30 minutes- I don't know if it was my pan size or the substitutions. Just a heads up.)

Creamy White Frosting

Ingredients:
1 cup shortening
1 1/2 tsp vanilla
1/2 tsp lemon, orange, or almond extract (I just used more vanilla)
8 drops food coloring
4 1/2 cups SIFTED powdered sugar
3-4 Tbsp non-dairy creamer

Cream shortening in mixer bowl, then add vanilla and other extract, and food coloring. Slowly add half the powdered sugar. Add 2 Tablespoons non-dairy creamer, and gradually beat in remaining powdered sugar. Add more non-dairy creamer to reach spreading consistency.

This makes enough to frost top and sides or two 8- or 9-inch cake layers. (Halve the recipe to frost a 13x9x2- inch cake.)


Dairy-Free Biscuits


This recipe is adapted from the Better Homes and Gardens 75th Anniversary edition "Biscuits Supreme" recipe. Dangerously fast to make and easy to eat, these are a great way to "dress up" a family dinner! This recipe might be vegan, but I'm not sure of the rules. Anyone know?

Dairy-Free Drop Biscuits

3 cups all-purpose flour
4 tsp baking powder
1 Tbs sugar
1 tsp salt (I used kosher)
3/4 tsp cream of tartar
3/4 cup shortening
1 cup soy milk

Place all ingredients except soy milk in bowl of food processor and pulse until mixture resembles corn meal, with some larger chunks remaining. Dump into a separate bowl and add the soy milk all at once. Stir until just combined- dough will be sticky.

Drop by spoonfuls onto a greased cookie sheet and bake at 450 degrees for 10 minutes, or until tinged golden.

I like to make my biscuits bite-sized, and place them all clustered together- it takes a few extra minutes of baking, but when they're done I dump them onto a tea-towel lined plate, and we break them up like monkey bread.