Tuesday, November 29, 2011

Whole Wheat Chocolate Chip Cookies


This was an experiment...a delicious one. I received the Cook's Illustrated Cookbook for my birthday a few days ago, and I am SO excited to try a few of the recipes out. They are well-laid out, and well-explained, and well-proved. Last night, I asked my daughter what she would like to bake today, and her answer was chocolate chip cookies! The recipe looked pretty familiar, so I decided to play with it a little. I subbed in whole wheat flour for the white flour, and used olive oil for half of the butter. The result was a chewy, hearty, nutty cookie that is absolutely wonderful. I wouldn't call these healthy...but definitely a healthier version of a lunchbox favorite! 


LoLo's Whole Wheat Chocolate Chip Cookies
(adapted from Cook's Illustrated Cookbook, Ultimate Chocolate Chip Cookies)

1 3/4 cups (8 3/4 oz) whole-wheat flour
1/2 tsp. baking soda
1 stick (4 oz/ 8 Tbsp.) butter
6 Tbsp. olive oil
3/4 cup packed (5 1/4 oz) brown sugar
1/2 cup (3 1/2 oz) granulated sugar
1 tsp. salt
2 tsp. vanilla extract
1 large egg plus 1 large yolk
1 1/4 cups (7 1/2 oz) chocolate chips

1. Set up your oven rack to the middle of the oven, and preheat to 275. Line 2 baking sheets with parchment paper or silicone mats. Whisk together flour and baking soda in a medium bowl, and set aside.

2. In a medium sized skillet, melt your stick of butter over medium-low heat. It will foam. Keep swirling and wait for the foam to subside, using your nose to watch for danger. You want the butter browned, but not burnt. When the foam goes down, your butter should be a nice chestnut color. Take it off the heat and mix in your olive oil. Dump your butter mixture into a large heatproof bowl.

3. To your large bowl, add brown sugar, granulated sugar, salt and vanilla. Whisk until totally incorporated. Add your egg and egg yolk, and whisk until the mixture is smooth and lump free. Set the mixture aside for 3 minutes, then whisk for 30 seconds. Repeat this process two more times until the mixture is thick, smooth and shiny. Use a rubber spatula to fold in your flour mixture just until combined, then add your chocolate chips. Make sure there are no streaks of flour. Roll your dough out into 2" (3 Tbsp.) balls and place 2" apart on your prepared cookie sheets.


4. Bake the cookies one sheet at a time 10-14 minutes, until the edges are just set but the centers are still puffy and soft. Underdone will give you a soft, chewy cookie. Cooking until set all the way through will give you a light, crisp cookie. Let the cookies rest on the pan for a minute after removing them from the oven, and then transfer the cookies to a wire rack to cool completely.


Wednesday, November 23, 2011

Lemon Chess Pie

This was still a bit jiggly when it was done, and a knife came out wet, but it set up in the fridge.  Kind of like lemonbars, but not nearly as sweet or tart :)  


I can't remember where this recipe came from, and had to search for it in my e-mail.  Luckily, I sent a copy to my MIL!  It's really, really good.


-Myrnie

Lemon Chess Pie

Ingredients:

  • 1 unbaked 9-inch pie shell (use your favorite pastry recipe or purchase frozen piecrust)
  • 1 1/2 cups sugar
  • 2 Tblsp. flour  (or 1 T flour and 1 T cornmeal)
  • 5 large eggs
  • freshly grated zest of one lemon
  • 1/3 cup fresh lemon juice
  • 1/3 cup butter, melted
Preparation:
  1. Preheat oven to 325°.
  2. Place pie crust in 9-inch pie plate...and flute edges.
  3. Combine sugar and flour in mixing bowl.
  4. Add eggs, one at a time, beating at medium speed with mixer until well blended.
  5. Add lemon zest, lemon juice, and melted butter. Mix well.
  6. Pour filling into the prepared pie crust.
  7. Bake on lower rack of oven for 45 minutes at 325°F...or until puffed and golden brown in colour.
  8. When cool...cut and serve each wedge with a dollop of whipped cream...and a sauce of fresh raspberries or blackberries

Monday, November 14, 2011

Brown Sugar Buttermilk Pie


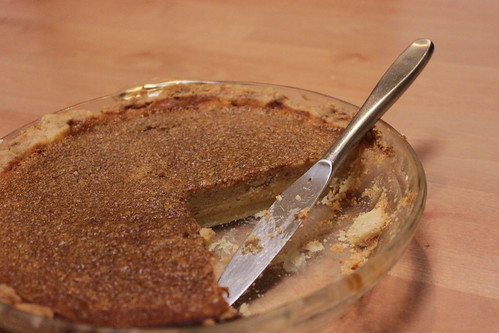
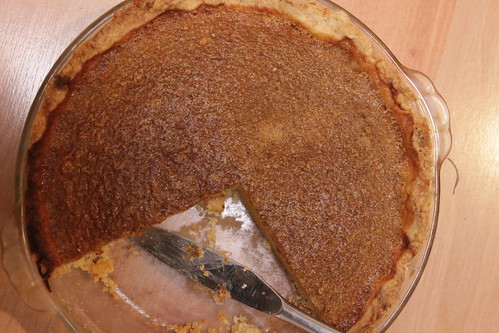
You need this pie, but if you eat this pie...eat nothing else.  With three eggs, 2 egg yolks, and 3/4 of a stick of butter, there's no messing around here!  BUT (and this is a big but.  Ahem.) You need this pie.

 I cook a lot.  A lot, a lot.  And this is the best thing to come out of my kitchen in a long time!  Crispy pie crust.  Soft custard.  Nutmeg that floats to the top.  Add this to your Thanksgiving line up, folks.

(If you don't subscribe to Martha's "Everyday Food" magazine, PLEASE do.  It's that good.)

browned butter- buttermilk pie


Brown-Sugar Buttermilk Pie
from Everyday Food originally, in my own words

3 Tbsp flour
3 large egg eggs, plus two more large yolks, beaten
1 cup packed brown sugar
1 1/2 cups buttermilk, room temperature
1/2 tsp ground nutmeg
1/4 tsp ground cinnamon
6 Tbsp unsalted butter

  1. Press your favorite single-crust pie crust into a glass pan, and bake at 425 for about 10 minutes.
  2. Put 6 tablespoons of butter in a small sauce pan on the stove, over medium heat, for 8-10 minutes and let it melt and cook.  It's going to froth up, and it's going to turn brown.  Swirl the pan occasionally, especially towards the end.  When the froth subsides, and it's nut-brown, it's done!
  3. In a mixing bowl, whisk together flour, eggs, and brown sugar until smooth.  Whisk in buttermilk, nutmeg, and cinnamon until combined.  This pie, with such small amounts of spices, is already heavily spiced.  I wouldn't recommend increasing them at all.
  4. When the butter is done, immediately whisk it into the buttermilk mixture.  It will foam up dramatically, be prepared!  Pour mixture into baked pie shell, and bake at 425 for 25-35 minutes, until the custard is set but still jiggly.  This will continue to cook a bit as it cools.
  5. Let cool completely, 2 hours, before serving.  Can be refrigerated up to 3 days.
(If you use this pie crust recipe, you won't be sorry!  It mixes together with a fork, IN THE PIE PLATE.  Then you just smash it out with your finger tips.  No rising, either, so it's perfect for this.  My  mom has always, as long as I've known her, left her pie crust behind when she eats pie.  It's just wasted calories, when she could be eating more filling! She ate this crust, and relished it :)

browned butter- buttermilk pie

--Myrnie

Friday, November 11, 2011

Sweet Potato Dessert Soup with Tong Yuen

IMG_0128


After a long day of sick kids, cancelled plans and one truly awful dinner (made by yours truly), Lo Gung and I both deserved something tasty (and filling..since dinner was so nasty). This is what came to mind. I had a few sweet potatoes in the refrigerator, and some ginger that was only getting spicier by the day. Sweet potato dessert soup (fan syu tong seui) is kind of a perennial staple around here. However, I am an absolute sucker for anything involving glutinous rice flour, so I got fancy and threw a few fresh tong yuen into the mix. The result was tasty, satisfying…and almost made us both forget about the long day we had just survived.


Aunt LoLo’s Sweet Potato Dessert Soup with Tong Yuen

Makes 2-4 servings

Ingredients:

2 medium sweet potatoes, peeled and chopped into 1” pieces (fan syu)

3-4” knob of ginger, peeled and cut into 1/2” chunks (geung) (fyi – ginger is super easy to peel – scrape it with a spoon)

1 lime-sized chunk of Chinese rock sugar (bing tong)

1/2 of a dried satsuma peel (chaang pei)

15-20  plain glutinous rice dumplings (tong  yuhn) (recipe here) (to make 15-20 dumplings, you will need approximately 1/2 cup glutinous rice flour and less than 1/4 cup water)

Water (4 rice bowls full)


1. Put your water, ginger and satsuma skin into a medium sauce pan, cover, and bring to a boil.

2. Add your chopped sweet potato, reduce heat to medium, and simmer until potatoes are almost fork tender.

3. Meanwhile, prepare your tong yuen. When the sweet potatoes are about 2 minutes from being done, drop your tong yuen into the simmering water. Continue to cook until the tong yuen float, then add your rock sugar and stir to melt. Taste the broth, and add more sugar if necessary.


Enjoy!

Tong Yuen

My apologies. This post has been sitting in my queue for…well, since the Super Bowl. I didn’t want to publish it until I could successfully use it to make my own tong yuen. And tonight…I did it! Tong Yuen are very simple, if you know what you’re looking for. Simply combine glutinous rice flour with enough water to make a dough. Easy peasy.

February 2011 037

Tong Yuen are one of my favorite Chinese treats. One of my companions introduced them to me when I was a missionary in Hong Kong. We were both craving something sweet and, since I was freshly arrived from America, my sweet companion was scouring the grocery store for ice cream that didn’t cost half of our weekly food budget. “No,” I said. “I don’t want something that sweet…” Right after she picked her jaw up off the floor (she knew I had a sweet tooth!), she grabbed a package of tong yuen from the freezer department. “Try these!” she said. We brought them home and boiled them up. They were delicious! Soft and chewy, filled with sweet black sesame seed paste, they were amazing. They are still one of my favorite ways to satisfy a sweet tooth, but I rarely get to enjoy them. They aren’t too expensive ($4 a package for the good ones), but I always seem to want to save them for a Special Occasion.


When my mother in law came to visit this month and told me she knew how to make them herself, I was so excited! She whipped these up, literally, an hour before we took her to the airport to fly home. They come together quickly, but create a lot of dirty dishes as there are several components coming together.


The trickiest part is, of course, making up the tong yuen. They are a simple mixture of glutinous rice flour and water. That’s it!

February 2011 032

This is too dry.


February 2011 034

This is too wet.

February 2011 035

This is just right! It should resemble…playdough? It’s similar to the Gaak you might have played with in elementary school (cornstarch and water). It stretches if you pull slowly, but snaps off if you pull quickly. You need to be able to roll it out into firm balls that will hold their shape. Just keep adding glutinous rice flour, or water, until you’ve got it right. My MIL started out with 2 cups of flour, and then decided to just mix up the whole bag. We made it our lunch. Yum!

February 2011 038

The boiled, and syruped, tong yuen waiting in a pan to be eaten.

February 2011 039

Our “dipping plate.”

February 2011 042


One very excited Lo Gung. He hadn’t had his mothers homemade tong yuen in years! (I was smarter than him, though. While he was busy watching the Super Bowl, I was hovering near his mother in the kitchen, hoovering up any unclaimed tong yuen as fast as I could. Heh.


These are very “traditional”. MaMa laughed when I said I wanted to learn. These are the treats of her youth, not the lovely filled ones you can find in Asian grocery stores now. However, I think these are just perfect. If you like fillings in your dumplings, you could definitely use this recipe to wrap up some red bean paste or sesame seed paste.


MaMa’s Tong Yuen

Makes enough for 4-6 people

Ingredients:

Dip:

2 Tbsp. sesame seeds

3 tsp. white sugar

1/4 cup nuts (cashew, peanuts, almonds, etc. Whatever you want.)


Syrup:

2 bars Chinese brown sugar (pin tong) (these are sold in Asian grocery stores and look like small bricks)

1/4 cup water


Tong Yuen:

2 cups glutinous rice flour, plus extra for adjustments

1/2 cup water, plus extra for adjustments


1. Prepare a medium sized pot and fill it about half way with water. Bring to a boil, then reduce heat and let it simmer until you are ready to cook your tong yuen.


2. In a small sauce pan, combine your pin tong (Chinese brown sugar) and water. Simmer, stirring occasionally, until the sugar is completely dissolved. You may need to help it along by breaking up the sugar bars with your spoon.


3. In the bowl of a small food processor, pulse your nuts until coarsely ground. (Alternately, you can put your nuts in a plastic bag and use a mallet or rolling pin to bash them up.) It should look like chunky cornmeal when you are done. Combine with your white sugar and sesame seeds in a small bowl, and set aside.

4. In a bowl, combine your glutinous rice flour and 1/2 cup water.  Mix it with your fingers and adjust the water or glutinous rice flour until you have the right consistency. Do not over-mix this. Over-mixed tong yuen are chewy, gummy, dense tong yuen. Not good eats. Use three-four fingers to lightly mix the flour and water together, sort of pinching and folding until everything is right. You should be able to roll it out into balls that will keep their shape. It will look a little like spackling!


5. When your tong yuen are rolled out, carefully lower them into your simmering water. Return to a boil, and cook until the tong yuen float (about 2-3 minutes).


6. When the tong yuen are finished cooking, use a spider or slotted spoon to fish them out of the water and into the pot of syrup. Stir to coat, then use your spider or slotted spoon to remove to a serving dish. You can sprinkle with your nut/sugar mixture, or allow your guests to dip their tong yuen individually as they eat them.


Enjoy!

Thursday, November 10, 2011

Gai Mei Bau (Rooster Tail Bun)

Hello, all! Welcome to my crazy. I am trying (and trying and trying) to recreate the Hong Kong Gai Mei Bau (雞尾包). It is my husband’s favorite bakery bun, and we haven’t found any great ones near our home. Oh, I’m sure they’re out there, but I’m too lazy to drive around and test buns from all the local bakeries to find a great one!


I’m just lazy enough to stay home and test recipe after recipe to figure out how to make them myself. Because that is how my crazy works.


My first attempt was using a recipe from Auntie Yochana (here). They were delicious. I omitted the Mexican Cream topping, as well as the egg wash and the sesame seeds. (They would have been delicious, I’m sure, but at that point in the day, I was tired of adding butter to my creation, and I was just tired in general. So…there.)


Oh my goodness, guys. These buns were seriously delicious. However, as tasty as they were, they didn’t taste like the real buns. The filling was declared “right” by Lo Gung, and so I will keep that portion of the recipe. The bread portion came out tasting a lot like the Australian Toaster Biscuits I loved to eat when I was a kid (and didn’t realize how much butter could be packed into a baked good. Mmmm…those were the days!).


So. Here’s the filling recipe (adapted from Yochana’s Cake Delight!)

Coconut Filling for Buns

250 gm. Butter, softened
250 gm. shredded coconut
120 gm. plain flour
100 gm. powdered milk
1/2 tsp. Vanilla extract


Combine all ingredients  in a bowl and set aside.

When I made my initial batch of buns, I made a half batch, and froze half of my filling mixture. If that doesn’t work out well….well, then, I will let you know.

My next attempt at the dough will be using this recipe, from Hong Kong Breads.

The first recipe I tried involved custard powder, which is fabulous in other applications, but I don’t think it quite works here. I’ll let you know how this goes!

Tuesday, November 1, 2011

Pan Seared Tilapia with Mandarin Orange Sauce


If this was a fancy restaurant, I might call this Mandarin Orange Pan Seared Tilapia with Crisped Ginger and Garlic. Whatever.


This was quick, delicious, and (amazingly) totally adored by everyone at the table. Including the five year old who would prefer to eat Nutella and bread five times a day.


Mandarin Orange Tilapia


Ingredients:

Tilapia filets

1/2” knob of ginger, julienned

5 cloves of garlic, thinly sliced

Olive oil

1 tin Mandarin Oranges

3 tsp corn starch

Green onions, to garnish


1. In a small sauce pan, stir together the can of mandarin oranges (including the juice), and the corn starch. Cook over medium heat until bubbly and thickened.

2. Meanwhile, in a skillet, combine a drizzle of olive oil with the ginger and garlic. Turn on your heat to medium high, and heat the oil until the garlic and ginger just start to sizzle and smell good.

3. Add your tilapia (carefully dried on paper towels!) and cook until golden and done, approximately 3-4 minutes per side.

4. Serve the tilapia over rice, with the orange sauce, and garnish with sliced green onions.


Enjoy!